Hip Pain: “Should I Be Concerned?”
Picture this: you’ve increased your training volume and intensity for an upcoming tournament that may have caused you some hip pain. Although you have general soreness after a hard training session, your hip pain has not diminished and continues to linger. The question you may have is, “Am I just sore or do I have an injury?” Typically, soreness, which is called “delayed-onset muscle soreness” or “DOMS,” lasts for approximately three to five days. Pain and/or soreness in the hip can stem from many structures. These structures can be contractile such as, muscle or tendon, or non-contractile, e.g., ligament, cartilage, bursa, or bone. If your pain lasts longer than DOMS, then an approach to evaluation and assessment should follow.
The hip is considered a deep ball and socket joint that is responsible for a large amount of force transmission to the pelvis and core area. Its ligaments are extremely strong and structured for a wide array of support, as well as movement. The hip joint should have a considerable range of motion in multiple directions (sagittal, frontal and transverse planes). This amount of free motion involves the ability to flex, extend, abduct, adduct, and outward/inward rotate. When motion is restricted, structures may become tight and other structures, such as muscles, may compensate and become injured.
Evaluation and Assessment
Evaluation and assessment of the hip can be broken down to issues regarding contractile or non-contractile structures. Muscle and tendon are structures that can become tight or weak causing compensatory movement patterns within the pelvis and hip. Areas that are typically weak or lack response time to engage reaction to forces are the deep hip rotators, core and glutes. In turn, this can cause hip pain due to dysfunctional movement within the hip joint. Additional structures that become tight and painful are the hip flexors and low back. When these structures are “turned on” it can cause the hip joint to “jam” or become tight leaving the feeling of pinching inside the hip joint and persistent pain. In contrast, non-contractile structures, such as bone, ligament, bursa or cartilage can become injured or irritated due to poor hip alignment from the hip muscle tightness.
Self-Evaluation Made Easy!
While it may be cumbersome to figure out which structure may be injured, there are basic principles to sort through the differences.
1. If the pain is consistent with self-movement (active) and subsides if another person moves it for you (passive), than you can be fairly certain that there is a contractile (muscles or tendon) issue.
2. In contrast, if pain is consistent with active and passive movement, in addition to persistent, then non-contractile structures may be involved. In addition to structural pain, an appreciation of movement should be understood. A quick assessment of normal weight bearing and gait analysis (walking) is necessary. If you or the patient is avoiding full weight on the involved hip (fear avoidance) or cannot walk normally, these issues should be identified.
Assessment of Hip Pain
Hip pain can refer to the groin (adductor) region, as well as posterior or lateral hip regions and lower abdominal areas. It’s important to understand location of pain. There are many provocation tests that can be done to better understand which structures may be injured.
C SIGN Test: This test is easily done by placing your hand in a C shape over the outside of your hip. Your hand would land where a person will have the most prominent pain if the joint was injured.
FABER Test: Lie on your back on a table or floor while a therapist passively brings your hip into full flexion, lateral rotation and full abduction as a starting position. Relax. The knee should drop to the floor or table. A positive sign is pain with or without a click in the hip region.
SCOUR Test: This test screens for femoral acetabular impingement or labral tears. Lie on your back on a table or floor while the therapist passively flexes and adducts the hip. The therapist then applies a compressive force at the knee on the knee cap driving directly down to the floor. The hip is then moved through an arc of flexion motion. A positive test is pain in hip region.
Reinforcement of Treatment
Once treatment has been covered, theses tissues may now have a new found length that needs to be addressed. Many times, lengthening joints and muscles by distraction places stresses on other muscles if not reinforced through quick corrective exercises. Here are some correctives that may help guide the patient.
SINGLE LEG ROMANIAN DEAD LIFT: While standing on the involved leg, hold a weight in the opposing hand. Tighten your glute while hinging at your hip, providing a teeter-totter affect. Do 2 sets of 6-8 reps.
Treatment of Hip Problems
Once the issue has been identified, relieving hip joint issues can be as easy as restoring normal motion in a restricted joint or surrounding soft tissues, such as muscle and tendons. Here are some self-treatment ideas prior to training that may help.
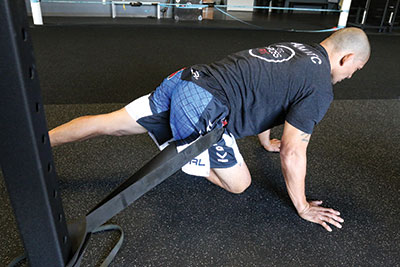
Banded Hip Distraction: Let the band pull your hip joint laterally and posteriorly. Do repetitions of 20.
Banded Hip Flexor Stretch: Tighten your glute on the downed leg while the band pulls anteriorly. Hold for 1-2 minutes.
BALL PSOAS (hip flexor) RELEASE: Place ball in-between crest of hip and belly button. This is where the psoas muscle lies. Find tendon spot and breathe while placing pressure on the ball. Perform for 30 seconds to 1 minute intervals.
GLUTE BALL ROLL: While sitting on one side, find tender point on glute and perform small oscillations for 1-2 minutes.
CORE ACTIVATION WITH HIP FLEXION: Start with core activation by pressing band into floor. Hands should come down to waist area. Once core is activated, raise the affect leg into hip flexion. Release tension on band after one rep and then restart. Do 3 sets of 6 reps.


